Montag, 25. Januar 2016

xrandr-tui

So, you want to change your screen resolution?
Have added a new LCD to your laptop and want to switch the displays?

Depends on: (xorg -)xrandr, bash and TUI (0.9.4-5 or later) (Website, Download, Install)

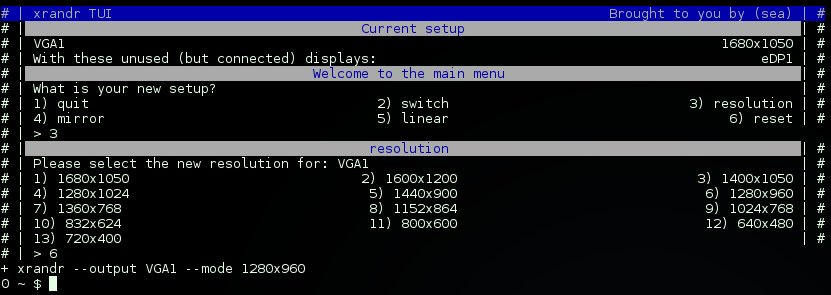
Have a look at xrandr-tui, if you do not want to type in those commands:

More functions are planned for the future, but first some optimizations for what currently is have to be applied.

It is meant for the use with WMs (Awesome, I3,dwm, etc) as it lets you set a base config, which will be used for:

xrandr-tui --switch
xrandr-tui --reset
xrandr-tui --mirror
Keep in mind, calling xrandr-tui by itself, will let you customize the task every time.
Whereas the quickaccess (arguments) will rely on the configuration file.
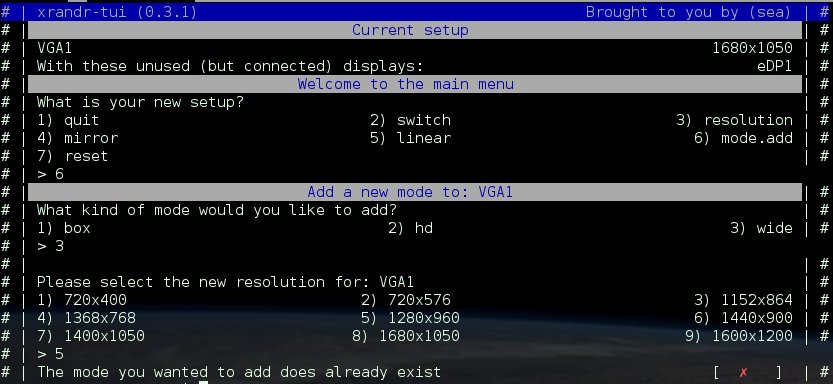
The screenshots you see here, are from xrandr-tui called without arguments.

You can even add and remove new/old resolutons:

Links

Sonntag, 24. Januar 2016

Change brightness of Screen

Well, beeing all about scripts here, got a new one:

The script is also a wrapper wether you have (xorg-)xbacklight installed or not, but if not, it requires sudo to be passwordless for the user (if called by a WM/without using terminal).

#!/usr/bin/env  bash
# Description:    Change brightness of laptop lcd
#        This script is part of my AwesomeWM configuration (https://github.com/sri-arjuna/awesome)
#        The most recent version should be available on: https://raw.githubusercontent.com/sri-arjuna/awesome/master/scripts/brightness.sh
# Disclaimer:   This code comes without any warrenty of any kind, use at your own risk!
# GNU General Public License (GPL) 2016 by Simon Arjuna Erat (sea) (erat.simon æ gmail,com)
#
#
#    Variables
#
    BASE=/sys/class/backlight
    ITEM=$(cd $BASE;ls)
    DIR=$BASE/$ITEM
    FILE=$DIR/backlight
    MAX=$(<$DIR/max_backlight)
    STEP_COUNT=20
    STEP_VALUE=$(( $MAX / $STEP_COUNT ))
    CUR=$(<$FILE)
#
#    Action
#
    if which xbacklight 2>/dev/null >&2
    then    # xbacklight is installed
        #cur=$(xbacklight)
        #cur=${cur/\.*}
        case "${1,,}" in
        "")    echo "Usage: brightness.sh up|down"
            exit 1
            ;;
        up)    xbacklight -inc 20
            ;;
        down)    xbacklight -dec 20
            ;;
        esac
    else    # Fallback, dont like the use of sudo in a background script
        # Required/recomend passwordless sudo, but is a security risk!
        case "${1,,}" in
        "")    echo "Usage: brightness.sh up|down"
            exit 1
            ;;
        up)    num=$(( $CUR + $STEP_VALUE ))
            [ $num -ge $MAX ] && num=$MAX
            [ $num -le 0 ] && num=0
            sudo tee $FILE <<< $num
            ;;
        down)
            num=$(( $CUR - $STEP_VALUE ))
            [ $num -ge $MAX ] && num=$MAX
            [ $num -le 0 ] && num=0
            sudo tee $FILE <<< $num
            ;;
        esac
    fi

Freitag, 22. Januar 2016

Awesome WM - MPD

Yeah finaly i got it working!
Took me only like 3 years to rework my original AwesomeWM configuration, and now, i'm almost done.

Currently just so happy about mpd finaly working, that i've added some tweakings for it...

When left clicking on the artist/title, mpc volume rises by 25, right click, lowers by 25.Mousewheel up increases mpc volume by 10, mousewheel down lowers by 10.

Click on the icon to get the playlist menu, with basic commands (in case the laptop is docked and i dont have 'fn'-key) for playback.
Anyhow, selecting any entry of the playlists, starts playing that directly.


CTRL+F4 (doesnt reckognize fn+f4) spawns an xrandr script, to change res/displaymonitor.
CTRL+F5, toggles the laptops touchpad
CTRL+F12 spanws my 'connect' script, for wifi.

The last thing i'm working on now, is to alarm when when/if battery drops below 10%, to get an annoying warning and reminderto plug in the power cord.

The complete config is found at: https://github.com/sri-arjuna/awesome
Enjoy and have a nice weekend!